MySQL Connector/NET 版本資訊
MySQL Connector/NET 提供 Web Parts 個人化提供者,可讓您使用 MySQL 伺服器來儲存個人化資料。
注意
此功能已在 Connector/NET 6.9.0 中新增。
本教學課程示範如何使用 Connector/NET 設定 Web Parts 個人化提供者。
若要設定提供者,請執行下列動作
將
MySql.Data和MySql.Web的參考新增至網站或 Web 應用程式專案。在
web.config檔案的system.web區段中包含 Connector/NET 個人化提供者。<webParts> <personalization defaultProvider="MySQLPersonalizationProvider"> <providers> <clear/> <add name="MySQLPersonalizationProvider" type="MySql.Web.Personalization.MySqlPersonalizationProvider, MySql.Web, Version=6.9.3.0, Culture=neutral, PublicKeyToken=c5687fc88969c44d" connectionStringName="LocalMySqlServer" applicationName="/" /> </providers> <authorization> <allow verbs="modifyState" users="*" /> <allow verbs="enterSharedScope" users="*"/> </authorization> </personalization> </webParts>
若要建立 Web Part 控制項,請遵循下列步驟
使用 Connector/NET ASP.NET 成員資格建立 Web 應用程式。如需有關執行此動作的資訊,請參閱 章節 6.2.1,「教學:Connector/NET ASP.NET 成員資格和角色提供者」。
建立新的 ASP.NET 頁面,然後變更為「設計」檢視。
從 工具箱 將 WebPartManager 控制項拖曳到頁面上。
現在定義具有三欄和一列的 HTML 表格。
從 WebParts 工具箱,將
WebPartZone控制項拖放到第一個和第二個欄中。從 WebParts 工具箱,將具有
PageCatalogPart和EditorZone控制項的CatalogZone拖放到第三個欄中。將控制項新增至
WebPartZone,其應與下列範例類似<table> <tr> <td> <asp:WebPartZone ID="LeftZone" runat="server" HeaderText="Left Zone"> <ZoneTemplate> <asp:Label ID="Label1" runat="server" title="Left Zone"> <asp:BulletedList ID="BulletedList1" runat="server"> <asp:ListItem Text="Item 1"></asp:ListItem> <asp:ListItem Text="Item 2"></asp:ListItem> <asp:ListItem Text="Item 3"></asp:ListItem> </asp:BulletedList> </asp:Label> </ZoneTemplate> </asp:WebPartZone> </td> <td> <asp:WebPartZone ID="MainZone" runat="server" HeaderText="Main Zone"> <ZoneTemplate> <asp:Label ID="Label11" runat="server" title="Main Zone"> <h2>This is the Main Zone</h2> </asp:Label> </ZoneTemplate> </asp:WebPartZone> </td> <td> <asp:CatalogZone ID="CatalogZone1" runat="server"> <ZoneTemplate> <asp:PageCatalogPart ID="PageCatalogPart1" runat="server" /> </ZoneTemplate> </asp:CatalogZone> <asp:EditorZone ID="EditorZone1" runat="server"> <ZoneTemplate> <asp:LayoutEditorPart ID="LayoutEditorPart1" runat="server" /> <asp:AppearanceEditorPart ID="AppearanceEditorPart1" runat="server" /> </ZoneTemplate> </asp:EditorZone> </td> </tr> </table>在 HTML 表格之外,新增下拉式清單、兩個按鈕和一個標籤,如下所示。
<asp:DropDownList ID="DisplayModes" runat="server" AutoPostBack="True"
   OnSelectedIndexChanged="DisplayModes_SelectedIndexChanged">
</asp:DropDownList>
<asp:Button ID="ResetButton" runat="server" Text="Reset"
   OnClick="ResetButton_Click" />
<asp:Button ID="ToggleButton" runat="server" OnClick="ToggleButton_Click"
   Text="Toggle Scope" />
<asp:Label ID="ScopeLabel" runat="server"></asp:Label>
下列程式碼會填入顯示模式的清單,顯示目前的範圍,重設個人化狀態,切換範圍(在使用者和共用範圍之間),並變更顯示模式。
public partial class WebPart : System.Web.UI.Page
{
  protected void Page_Load(object sender, EventArgs e)
  {
    if (!IsPostBack)
    {
      foreach (WebPartDisplayMode mode in WebPartManager1.SupportedDisplayModes)
      {
        if (mode.IsEnabled(WebPartManager1))
        {
          DisplayModes.Items.Add(mode.Name);
        }
      }
    }
    ScopeLabel.Text = WebPartManager1.Personalization.Scope.ToString();
  }

  protected void ResetButton_Click(object sender, EventArgs e)
  {
    if (WebPartManager1.Personalization.IsEnabled &&
      WebPartManager1.Personalization.IsModifiable)
    {
      WebPartManager1.Personalization.ResetPersonalizationState();
    }
  }

  protected void ToggleButton_Click(object sender, EventArgs e)
  {
    WebPartManager1.Personalization.ToggleScope();
  }

  protected void DisplayModes_SelectedIndexChanged(object sender, EventArgs e)
  {
    var mode = WebPartManager1.SupportedDisplayModes[DisplayModes.SelectedValue];
    if (mode != null && mode.IsEnabled(WebPartManager1))
    {
      WebPartManager1.DisplayMode = mode;
    }
  }
}
使用下列步驟驗證您的變更
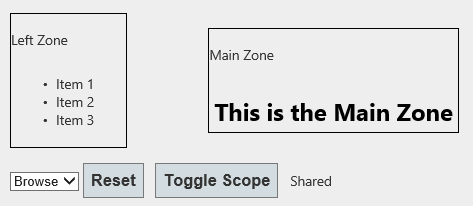
執行應用程式並開啟 Web Part 頁面。頁面應與下圖所示範例類似,其中「切換範圍」按鈕設定為
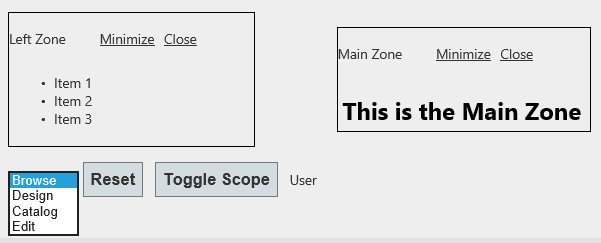
共用。頁面也包含下拉式清單、「重設」按鈕,以及「左側區域」和「主要區域」控制項。預設情況下,當使用者帳戶未經驗證時,範圍為共用。使用者帳戶必須經過驗證才能變更 Web Part 控制項的設定。下圖顯示一個範例,其中經過驗證的使用者能夠使用「瀏覽」下拉式清單自訂控制項。清單中的選項為
設計、目錄和編輯。按一下 ,將應用程式切換回共用範圍。
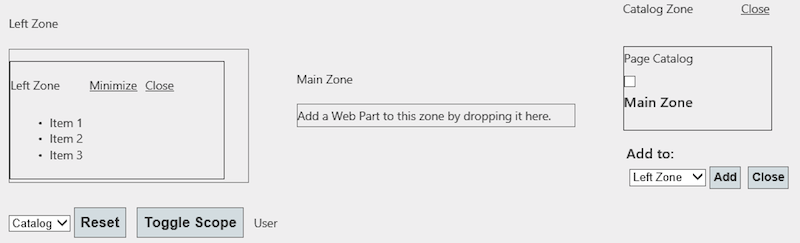
現在您可以使用特定使用者或所有使用者層級的
編輯或目錄顯示模式來個人化區域。下圖顯示從下拉式清單中選取的目錄,其中包含先前新增的「目錄區域」控制項。